Showing posts with label living room. Show all posts

Thursday, January 26, 2012

Decorating for Two: Living Room Edition

When I was describing the house offer situation earlier this week, I left out a couple details.  I would like to think that I did not get emotionally attached to the house, but the truth is, I didn’t even try to stay away from letting my emotions cling to the house.

You see, I’m very good at rationalizing things to myself and my hubby.  Before we even saw the house, I was dreaming of how we would decorate the house if we got it.  Surely, by making a few moodboards (that took a few hours to create), I would not get emotionally attached to the house.

Yeah, right.  I promise I’m not as dumb as I seem!  I’m just a passionate dreamer!  I rationalized the mood boards by telling myself that we could easily use the moodboards for a different home – I was simply trying to determine our style before we got to a house.  It’s a very important house hunting step to determine your style first, right?  Hmmm….not really.

Instead of letting the mood boards go to waste until we find a house (if we even use them when that day comes), I thought I would share with you what our combined decorating style is, since our apartment is definitely not the best reflection of it (read: no time or money to make our apartment pretty at the moment and we were waiting to get a house before we went all out on décor).

My decorating style could be described as feminine, colorful, bright, cottagey, and quirky.  Mr. Converse Sneaker’s decorating style is more masculine, with more neutral colors, darker tones, and less bright.  After living together for a while now and sharing our likes and dislikes, we have started to be drawn to similar rooms.

Here are some rooms we both like (neither of us are in love with any of the rooms, but we both like most of each one).  Click on any of the images to be taken to the pin on my Pinterest.

sarahlivingroom1

sarahlivingroom3

sanlivingroom1

sarahlivingroom4

sanlivingroom2

We both like:
  • A large amount of neutrals (usually white, light gray, or deep mocha brown) with lighter pops of color
  • Light-colored sofas (I prefer an English roll arm sofa and Mr. CS likes anything that looks comfy)
  • Nothing that is overly matchy
  • Fun, quirky details
  • Vintage/retro details

When I saw our dream house, I knew the entry way living room would make a perfect place to create a multifuctional room that works as an entry way, living room, office, and library.  This is the mood board I came up with:
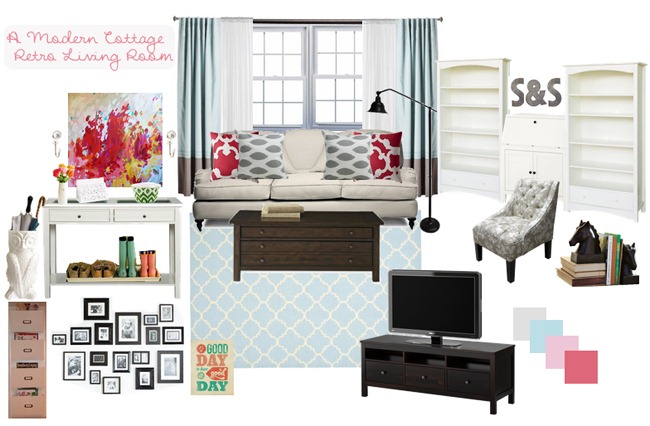
moderncottagelivingroommoodboard

Click here or on the image to head to the original mood board on Polyvore (where I created it) to get get more details about each item.  I wasn’t going for a specific source list we would use, since we would probably find most items by thrifting, researching like crazy, or making them ourselves.  This was to serve as a jumping off point for the room.

I started with the entry way area, which is on the left side with a console table that would hold papers, keys, gloves, and boots.  Above it would be some really awesome abstract art that would serve as the piece that determines the room’s color scheme.  I saw some cute hooks with the letter “s” on them since both our names and our last name start with “s” that we could hang our keys on or even dog leashes once we get a dog.  I really had it all planned out!

We would get a cute owl umbrella holder (Mr. CS loved that detail) and hang a wooden wall pocket system by the closet door to sort our mail.

The living room portion of the room is found in the middle of the image.  Of course, it would have an English rolled arm sofa (my absolutely favorite) with some fun pillows.  The curtains would be layered to make the room a little fancier and would pull in the blue.  The rug would add a graphic trellis pattern and more blue.  Instead of having all white furniture since we like to mix and match different finishes, the coffee table and media console would be richly stained wood.  I had plans of including a whole wall of art and photos since I’m a gallery wall fanatic.

Then, along the back wall of the room that would also act as a hall and the first thing people would see when they walked in, would be two white bookshelves flanking a secretary desk.  The book shelves would be beautifully styled (of course) to bring in more color and personality.  The secretary desk would serve as our command center where we would pay bills, write letters, meal plan, etc.

As much as this mood board was catered to a very specific room in mind, we could easily take many of the ideas and plan them to a different room, perhaps even in an apartment.  I was sad when I found out we would not be getting the house because I was really excited for this room, but at least now we have a point of reference that we both love (yes, my hubby is fully on board with the design scheme, I can barely believe it) that we can turn to when making decorating decisions.

What do you think of our combined style?  Have you ever planned an entire room, only to learn that it would never work or the room you planned it for would never be yours?

Linking up with Five Days . . . 5 Ways

Monday, November 7, 2011

Storing Books in Style

I have trouble with clutter.  Our home gets cluttered often because we are not home enough to organize constantly, nor do we have lots of space to keep things nice and organized.  I am a tad OCD, however, when it comes to clutter, because I cannot think if I’m in a cluttered room.  If I have to write a paper or read for school, the room I am in needs to be clutter-free, meaning no random things on the floors or furniture.  Everything needs to be put away.  I am okay with stacks of what I like to call “organized clutter” which is what I do when I go into school/homework mode and need a clutter-free room quick.  I take the clutter and organize it by category into a pile and put the pile somewhere I can’t see very well.  This doesn’t solve the clutter issue, but it makes it manageable for the time being.

Somehow, my rambling really does connect to our bookcase in our living room, I promise.  The current styling of the bookcase was done with little thought, and to me looked like a big case of clutter, which is the opposite of how I think a bookcase should look.

See what I mean?

bookcase1

So, I admit that in photos it doesn’t look that bad, but the rest of the living room is fairly neutral with pops of colors whereas the bookcase is one giant blob of tons of colors.  I find it distracting when I am trying to get anything done in there because it looks like a cluttered mess to me.

I decided to style it differently.  I would love to not even have the bookcase in this room because I would much rather have a whole wall of bookcases in an office or library where I could stand all the books because it would make sense, but that is not an option for us.  I didn’t even think about covering all the book because, although the room would feel a lot more peaceful, I would go insane covering them since I have hardly any time lately and that would be a huge undertaking.

Instead, I sorted the books by color, moved some to our entertainment stand with concealed box storage, and added a few more nick nacks to make it more homey and fill up the extra spaces.

Here is the after shot:

bookcase2

While the colors still bother my eye, they are now organized and styled better, so I can live with it.  Part of apartment living (or any living, I suppose) is doing the best with what you have.  I could definitely buy some accessories that would fit our style more to make everything look better, but we don’t plan on living here for a long time and would rather wait until we have a style for a future home.

Let’s get a closer look at the shelves:

bookcase3

I love my ornate frames!  The one on the top shelf holds a postcard of the Minnesota state fair.  the biblical wooden quote was a gift from San for one of our anniversaries.  The candle accessory on the second shelf was a wedding present.  I do like that the pops of red help balance our new lamp shade I covered.

bookcase4

The third shelf from the top has a blue mason jar with our loose change, a photo of us with our two friends, Courtney and Pat, at our junior prom (crazy that we’re now married couples and they have a baby).  the stack of vintage pop cans (yes we say pop here in Minnesota) were purchased on our honeymoon in Duluth, Minnesota.  They’ve been in storage, so I threw them in since we love them so much.  I want to use them as flower vases in our first kitchen once we buy a house.  The second shelf has a wooden plaque that says, “Friends are the family one finds along the way,” which was coincidentally a present from Courtney for my birthday.  I love all of the sentimental touches even if it still looks a little cluttered!

Now, I want to know if you style your bookcases or if you let the books accumulate and enjoy the collected look?

Monday, October 24, 2011

Making Room for the Crafter in Me

Between graduate school, working 25 hours a week, starting a photography business, teaching at my final field experience, adapting to married life, and driving my husband crazy, I have little extra time.   Some days I leave for work at 8am and get home from class at 10:30pm.  The little time that I do have left, I blog, spend time with my friends (which does not happen enough), and spend time with my adorable husband.  However, none of the things I do are solely “me” activities.  Sometimes I need a little me time, to clear my head, to feel good about myself, and to re-inspire myself for the next week or two.

Usually, me time includes crafting because it can be done cheaply, it is incredibly inspirational, and it helps us have pretty things without having to spend lots of money.  However, all of my crafty supplies are in our laundry/storage room which we have to go through our bathroom to get to.  It is not convenient at all, so we usually don’t do things that involve dragging boxes out of the storage room because that adds tons of extra time.

DSC_0040

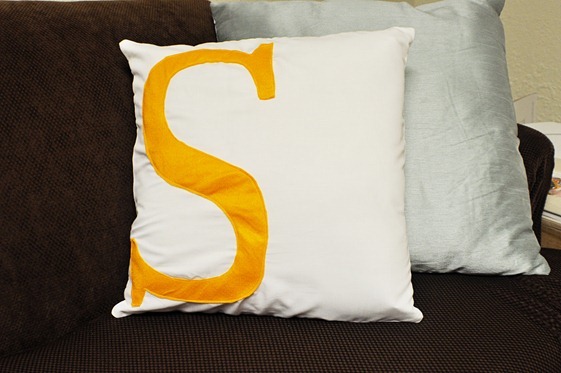
For example, when I made our “S” pillow, I spent nearly half an hour lugging all the materials I needed (sewing machine, scissors, sewing kit, sewing supplies, paper, etc.) from the storage room to our kitchen table upstairs.  When I am already limited on time to myself, I hate spending part of it just getting ready to do something fun and inspirational.

The problem we face with this whole scenario is that we don’t have another room to make into a craft room, which I would love, but it’s just not practical or even possible right now.  We barely have any extra space in our bedroom or living room.  As much as we want to live in a beautiful home with a room for every want and need, we would rather have spaces that fit our needs, regardless of whether they are completely pleasant to the eye (although that is always a bonus).  So, we decided (okay, it was more of a solo decision made by me – my hubby is great enough to let me do my own thing from time to time) to add an itty-bitty craft area.  But where would we put it?

Well, we brought down the bookcase I made with my dad so we could have our books closer, so that meant even less space in the living room.

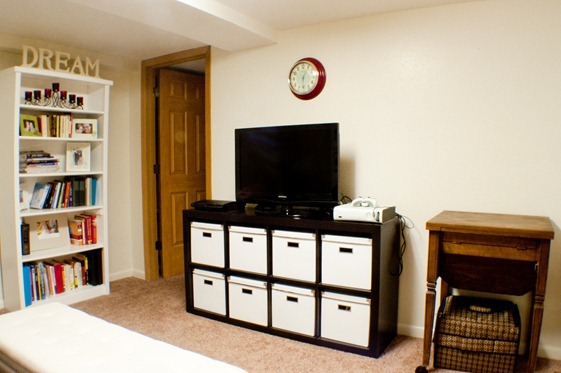
DSC_0532

It’s not shown in this photo, but it sat to the right of our entertainment stand.  That left the area next to our bedroom door, to the left of the access panel sticking out of the far wall in the photo above.  However, a craft area requires some kind of table surface, and that space has no room since we need a walkway to get into our bedroom.

So, we did a little rearranging and this is what we came up with:

craftarea1

We moved the bookcase to the empty spot on the far wall (I’m still working on how to arrange the books – bookcases can sometimes be a little chaotic with all the different book colors, but I’m not about to cover them all).  This arrangement gave us a tiny area next to the entertainment stand for a craft area.

When my parents came to visit us a couple weeks ago, they brought up a vintage sewing table they thought would be perfect.  Here it is in the space (it will be painted once I decide on a color):

craftarea2

craftarea3

Luckily, me sewing machine just barely fits in the drop down area so I can keep it close by without having it sitting out.  the top of the table has hinges so it opens up to twice the size, and it’s on casters so I can move it to the couch or somewhere else in the room if I don’t want to be cramped in the corner, keeping the bathroom door from opening.  It is not the ideal arrangement, but it’s the only one that makes sense.

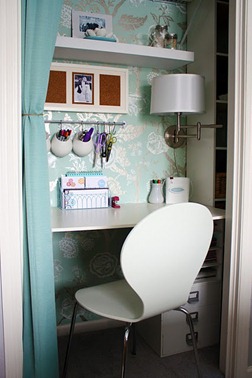
This is just the first step for this little craft nook.  I have small dreams of what I want it to become over the next couple months (since this is not our main priority right now).  I did some searching around for what other people have done with small spaces to make little craft nooks:

craftinspiration1

craftinspiration2

craftinspiration4

craftinspiration5

craftinspiration6

craftinspiration8

craftinspiration10

craftinspiration9

craftinspiration7

I would love to go all girl-crazy on the space, but because I share this room with my macho husband (if macho men secretly love Anne of Green Gables and are obsessed with babies), I’m going to keep his wants in mind as well.  I would love to teach Mr. Converse Sneakers to sew (once I officially learn how), so if I keep the area a little more gender-neutral, maybe he will get his craft on as well!  I’ve never really been one to crush on macho men, anyway.  I love seeing my man in an apron or covered in paint.

I’ll keep you posted as we make over our little crafty corner and I’ll definitely let you know what I create in that little space.  Stay tuned this week to read about my first test run in the new craft nook.  It does involve my sewing machine, but I wouldn’t call it a craft.

Where do you get your craft on?

Wednesday, September 14, 2011

A Gallery of Sorts

Ever found yourself staring at a room in a mazagine or on your favorite decorating blog, wracking your brain to find some place in your own home you can recreate what you see?  I do it all the time.  I’ve had it bad for quite some time because I started reading blogs a few years ago and read decorating magazines long before that.  I’ve seen many a room I would love to recreate and not until this day do I actually have some space to play with and get a little creative.

For many years I have been pining for a gallery wall.  I didn’t care where it was, I just wanted one!  When John and Sherry turned their hallway walls into a mecca of all things art, I could not contain myself!  We don’t have a hallway or even a good place to hang a whole wall of photos (plus we don’t have the money to buy enough frames and art to fill an entire wall), but I have fallen almost equally in love with a mini gallery wall centered above a sofa, which is what we set out to recreate in our living room!

Here’s what I’m talking about (click each photo to be taken to my pinterest that lists the source):


Believe it or not, I actually love when the frames are white if the wall is a color, but since our walls are an ugly off-white, white frames just would not work.

However, we also did not want to go with black frames.  Why?  Let’s look at our room a little more closely:

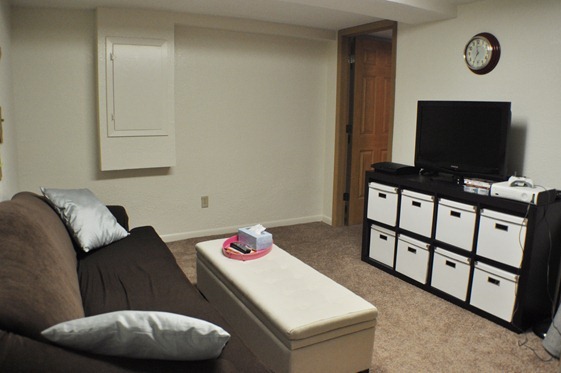
DSC_0532

You would never guess that I’m a huge color-lover by looking at our rooms, or that my favorite neutral color is a soft gray.  Nope, because every neutral color in our room is a variant of brown besides the bright white boxes in our Expedit/TV stand.  I was always told never to mix black and brown, which was fashion advice that I don’t always take, but in our living room, I wanted to stay as far away from black as possible.  If I could paint the whole TV and screen a different color I would!

So, I had to get creative with our color choice for the frames.  I don’t care for the look of mismatched frames in a gallery wall since my eyes love order.

This is the sneak peak I shared last week:

DSC_0539

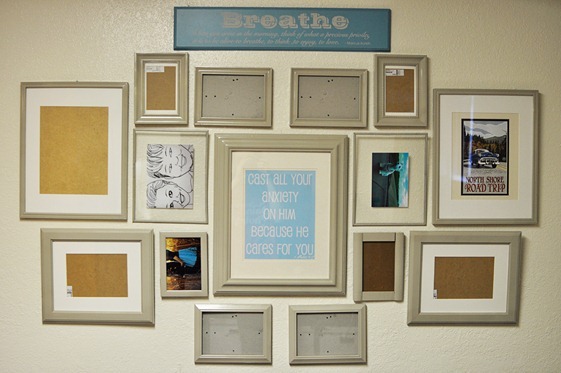
I spent so much time cutting out the frame shapes, numbering them, taping them up, and it was all pretty much for nothing.  A few of the frames completely rejected the spray paint, so they were out and had to be replaced by other frames.

Here’s our frames laid out on the floor for a test round before painting:

DSC_0391

The configurations changed slightly when the spray paint wouldn’t adhere to the frames, so I am not completely pleased with the way it is now, but it’s good enough.  We don’t plan on living here for much more than a year, so I can live with it for now.

Semi-funny story before I reveal the final product.  We put off painting the frames for some time because we could not figure out a good place to do it.  We knew outside would be best, but we don’t have any outdoor space of our own and didn’t want to bother our neighbors with the fumes.  I finally decided to set up shop in our laundry room which has no windows, only one door leading out (to two different rooms with no windows), and stores our gas water hear with a pilot light (foreshadowing, anyone?).  Thank God (quite literally) that I hopped on good ole Google moments before painting to find out how dangerous this was.  I probably would have set our apartment on fire since the vapors had nowhere to go but straight toward our pilot light.  Writing it down makes me realize how not-funny this was.

Anyway, we decided to risk it outside and moved as far away from apartments as we could in our parking lot.   The paint we used was this:

DSC_0393

I knew nothing about it (and still really don’t), but I know it was at our local hardware store, it was on clearance for $1.50 a can, and it claims to bond to all sort of tricky materials.  Sounded perfect, and it ended up working okay, so we’re happy.

As for the color, since I’m a self-proclaimed gray-lover, we went with the softest gray we could find.  This color was actually more than perfect because it’s actually a gray-brown, especially in our living room filled with browns.  I love white frames, so I didn’t want to stray too far from white by going really dark (plus we’re trying to lighten the room not darken it since it has no windows).  We love how the color looks against our walls!

Here it is seconds after I finished pounding nails into the walls (sorry neighbor!):

DSC_0588

I really love how the gray-tan makes the white mats pop!

I must admit that I love an asymmetrical arrangement, but I could not get it to work.  I’m too type-A appartantly to go all asymmetrical above a symmetrical sofa.  One day I will do an asymmetrical arrangement!  It’s on my imaginary list of things to do before I die.

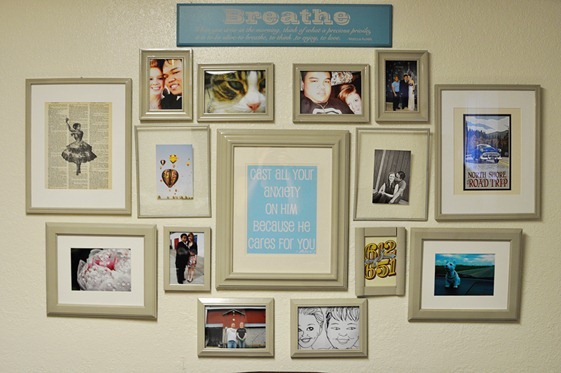
We still do not have all the art collected that we want to add to the frames, so our semi-final product contains a collection of random photos and art we had laying around.  It’s good enough for now.

See?

DSC_0610

DSC_0605

Some things we would like to include (some of which are included) are: nods to places we’ve visited (like the North Shore Road Trip print on the far upper right), references to our home state/town/current city (like the 612/651 print to the right of the middle print which is the local area codes), things dear to us (like pets, balloons since they were part of our wedding, quotes, photos from special occasions), and things we created ourselves (like the shot of the peony in the lower left corner that I took a few summers ago).  Over time, we think our gallery wall will be a perfect reflection of the two people who daily sit on the couch below it.

DSC_0606

DSC_0608

DSC_0609

I also would like to add a few extra frames since some got the boot when the paint didn’t adhere, but who knows if we’ll get around to it.  This room still has a lot lacking compared to our imaginary vision of the room, so we’ll keep you posted as we spruce it up on as little money as possible!

Where is a place in your home you use as a reflection of yourself/family/hobby/passion/job/etc.?

LinkWithin

Related Posts Plugin for WordPress, Blogger...